Affinity Photo Is Nothing Short of Black Magic
If you’ve been following this blog for some time now, you’ll know that I’m heavily into photography. My photographic interests are wide and varied, but in the main would go in the direction of street photography and art photography. The street photography side of things is to create portraits of people. I’ll also make images without people, but are nevertheless interesting in another way. I have a preference to use a telephoto lens to get in close. Talking about getting up close, I have also done some macro photography which I enjoy. I like to find shapes and patterns I can use to make strong, are often abstract images. The application I’ve found to work well for what I want to do with my images is iColorama. This resides on the iPad and also on the iPhone. It’s a fantastic application which gives a multitude of artistic choices. Starting with the basic adjustments and levels to some pretty wild and amazing pixel manipulations. I really do like to punish those pixels to within an inch of their lives. When it comes to working on the Mac, I have a fondness for the application Intensify Pro which allows me to really push those pixels around. Another Mac application which gets my creative juices flowing is Topaz Impression. I enjoy these applications because they give so much in terms of turning a standard boring photo into something artistic. I’ve had the application Affinity Photo which is a Photoshop alternative and to be honest I’ve not really made the most of it. Lately I’ve been watching a load of tutorials and I realise I should be getting familiar with Affinity Photo. It might not do some of the wild effects with one click as you can with my other favourites, but it is completely amazing and nothing short of black magic. The In Painting tool is amazing!

Some of the great things you can do with Affinity Photo
Affinity Photo has just been upgraded to version 1.5 and gained some extra capabilities.
- The application will now do HDR merge and has a persona for tone mapping.
- Extra compatibility with the Photos app.
- Batch processing so you can do work with multiple images quickly.
- Image editing for 360° spherical photos.
- Life perspective projection – This lets you work with a section distorted by perspective as if it was flat.
- Focus merge which is especially good for macro photography.
- Plus a whole load of other improvements.
Working HDR images in Affinity Photo
When you’re stacking images together to get the high dynamic range of an image, there are a couple of HDR specific apps you could choose to use. For a long time I was using the application Photomatix Pro as my go to HDR app. Lately I started using the new Aurora HDR application which if you are really into HDR is the app to go for. However, Affinity Photo is more than capable and is only lacking in the number of presets you can use as starting points for your HDR image. Within the Affinity Photo application there are a plethora of controls to get just what you’re looking for. You can tone map your merged image into a mild HDR or you can go to the other end of the scale with a wild HDR. I haven’t tested this fully yet, but I expect by using the macro recording feature now with Affinity Photo, you’ll be able to create your own HDR presets. The macros are shareable so I expect they’ll be somewhere to find HDR presets made by other photographic artists.

It’s not difficult to throw together a number of exposure bracketed source images in Affinity Photo. You’ll have the automatic alignment in case you’ve taken the photos handheld rather than using a tripod. The HDR capabilities you get with the application are pretty cool. If you like twiddling and fiddling and playing with sliders, then you’re going to like it.

Round trip Apple Photos and Affinity Photo
With Apple Photos continually improving and getting better as a way to manage your photographic library, having full access to Affinity Photo is extremely useful. It can still be a good idea to make a duplicate first before sending an image to Affinity Photo. Or you could export the original file with the full data ,or a TIFF file to use with Affinity Photo. The reason you’d want to do this is if you make changes to your photo in a number of extension applications and something doesn’t work out quite right in one of them, the only thing you can do is to go right back to your starting point. Even if you’ve only used one third party extension you may find having to start again if you just want to change one of the adjustments you made. You’re always going to have much more control over the nondestructive ability aspect of manipulating with photos by working directly in Affinity Photo. This is because you’ll be working with layer masks, pixel layers and be able to move the layers around and tweak adjustments to your heart content in this professional photo editing application. If you know what you want and can do it in one shot then round tripping with Apple Photos will work out well for you. The bigger the job you plan to do with your photo, the more likely it is it’ll work better exporting a separate file out of Apple Photos.

Batch Processing With Affinity Photo
When you’re batch processing it’s useful for something like getting whole pile of images ready for a specific type of export. You want to send photos to Google+ and you have limited bandwidth so reducing the size of your images is a good idea. Start a new batch processing job within Affinity Photo and add all of the images to the batch. You can collect images from a few different places as you need to then have them saved back to original folders or send them somewhere specific.
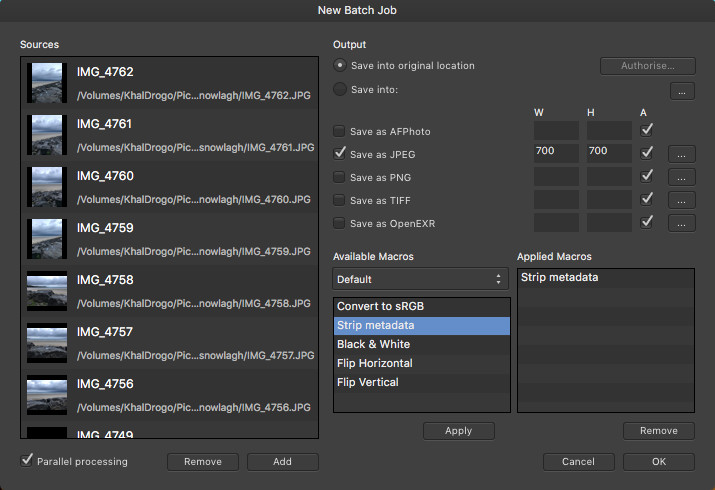
If you’ve created macros which you want to apply to a batch of photos you can choose the macro and add it to the setup. I had a macro which changed the dimensions of the photo, but I found it was better to use the built-in settings within the batch processing for that part of the job. So you could use macros which crop the top of an image off (good for working with screenshots from the iPhone). Or use macros which convert to black-and-white, sharpen the image, do adjustments of saturation or vibrance, make adjustments to white balance and so on. Then use the batch settings to set the size. The use of macros and batch processing will save you lots of time.
Editing Spherical Photos in Affinity Photo
I absolutely adore taking spherical photos with my iPhone 7+. I can often be seen in a place rotating around a spot, pointing my iPhone camera in all directions. The latest spherical photo I took was in Platja d’Aro at the beach. Before that I was in Ireland where I took a picture of an amazing vista from the top of a megalithic burial mound. I take these photos with my iPhone camera, I don’t have a specific 360° camera. I am tempted to buy one at some point in time though. For the moment, the iPhone camera works really well and I use the Google Street View application to get the images. I do have other applications for taking spherical photos, but I don’t tend to use them much. It’s great being able to edit these specialised photos in Affinity Photo. It’s pretty easy to do and it works excellently.
You can do the full range of editing available with Affinity Photo on your 360° images. You have the basics of adjustments to hue, contrast and saturation as well as any other levels same as you can adjust on other normal photos. It’s easy to make use of the In Painting tool to fix areas of your photo. For example you might have missed a small section in your photo and you can use the In Painting tool to fill it in. This is another occasion when you might think that Affinity Photo is pure black magic. If you are taking a picture containing people and those people were moving it’s possible you might have the same person in two or three places in the photo. Use the In Painting tool to remove these duplicate persons.
The way to use Affinity Photo is to get the flat image showing as a projection so you can click and drag to move in 360°. Do this to find the spot where you want to make adjustments. All you do then is to click on the tool you wish to use and do what you have to do to improve your photo. When you’ve finished your editing you’ll find you don’t have the 360° projection working so you have to go back to the menu to start it up again. You can edit the photos so filters and effects affect the whole of the image all the way around. This is useful if you want to do something like adjusting the exposure or saturation across the whole of the image.

Making Use of Focus Merge in Affinity Photo
When you take a macro photograph you’ll find you have a very shallow depth of field. This is where Affinity Photo will come to your aid. What you do is to take a series of shots, as many as you need so your subject in the photo is sharp wherever it is in terms of depth. For macro shots you are almost certainly going to be using a tripod. You’ll only just need to make sure you don’t move the camera physically while changing the focus. Consider using a camera which has an application on your iPhone so you can control the camera indirectly. In Affinity Photo add your new stack of focus adjusted photos. It’s as simple as clicking a button and telling the software to do the job. There is just a possibility you’ll have to do some adjustments after the algorithm has finished its work. There is a way you can use these source photos and the Clone Tool to do a manual composite from whichever photo has the best, sharpest in focus image for that part. When you’ve got the photo just the way you want it, finish off by making whatever other adjustments. Do what you feel is necessary to get the image you’re looking for.

